How to Install Phpmyadmin in Ubuntu 18.04 Using Terminal
The installation of phpMyAdmin has changed for Ubuntu Server 18.04. Jack Wallen shows you how to get this powerful MySQL web-based GUI up and running.
If you're a MySQL database admin you understand the importance of having the right tool to manage your databases. Yes, you can do everything you need from the command line, but some admins prefer a nice GUI tool to get the job done.
For that, you could turn to one of the most popular MySQL admin tools phpMyAdmin. This web-based tool makes working with your MySQL databases incredibly easy.
However, the release of Ubuntu 18.04, caused the installation of phpMyAdmin to change.
I want to demonstrate how to install this tool on the latest release of Ubuntu Server, so that you can enjoy the ease of MySQL administration with a user-friendly web-based GUI.
SEE: Server deployment/migration checklist (Tech Pro Research)
What you need
I'll assume you already have your MySQL database server up and running, as well as a full-blown LAMP stack. I'll demonstrate this on Ubuntu Server 18.04. Should you use a different server distribution, the only thing to make note of is the installation process.
Installation
The installation of phpMyAdmin is incredibly easy. Here's what you need to do:
- Open a terminal window on your Ubuntu Server.
- Issue the command sudo apt-get install phpmyadmin php-mbstring php-gettext -y.
- When prompted, type your sudo password.
- Allow the installation to complete.
During the installation, you'll be prompted to select the web server to be used (Figure A). Make sure to select apache2.
Figure A
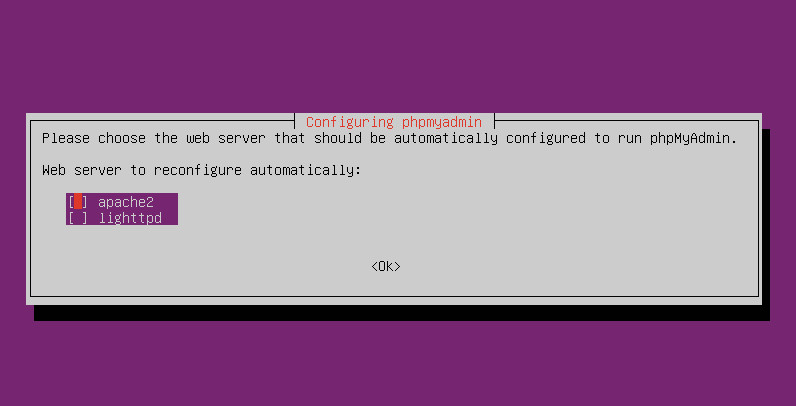
Selecting the proper web server for phpMyAdmin.
You will also be prompted to okay the installation of a database. Make sure to select Yes for this option. Next, you'll be asked to set a MySQL application password for phpmyadmin (so it can register with the database server). Type and verify a unique (and strong) password. Finally, you must enter the database admin user password.
Once the installation completes, you should now be able to point your browser to http://SERVER_IP/phpmyadmin (where SERVER_IP is the IP address of your hosting server) and log in.
SEE: Wireless networking policy (Tech Pro Research)
Here's the first gotcha with MySQL on Ubuntu 18.04: You cannot, because of security issues, log in as the root user. In order to use phpMyAdmin on Ubuntu, you must log in with a different user. It's a good thing that during the installation of phpMyAdmin you created a password for the phpmyadmin user. So log in with the user phpmyadmin and the password you created for that user.
Here's where you run into the second gotcha. Upon logging in you will immediately discover the phpmyadmin user is very limited in what it can do. To make the phpMyAdmin GUI a viable solution, we must change that.
Granting permissions
In order to fix this problem, go back to the terminal window on your server and log into MySQL with the command:
sudo mysql -u root -p
Once at the MySQL prompt, you need to grant the proper permissions for the phpmyadmin user with the commands:
GRANT ALL PRIVILEGES ON *.* TO 'phpmyadmin'@'localhost'; FLUSH PRIVILEGES; EXIT
Log out of the phpMyAdmin GUI and log back in (still using the phpmyadmin user). You should now have full privileges for MySQL with that user.
If you're concerned about security you could create an entirely new MySQL admin user like so:
CREATE USER USERNAME IDENTIFIED by 'PASSWORD'; GRANT ALL PRIVILEGES ON *.* TO 'username'@'localhost'; FLUSH PRIVILEGES; EXIT
where USERNAME is a unique username and PASSWORD is a unique, strong password. With this user created, you can now log into phpMyAdmin with those credentials and get to work.
Enjoy the power and simplicity of phpMyAdmin on Ubuntu 18.04.

Open Source Weekly Newsletter
You don't want to miss our tips, tutorials, and commentary on the Linux OS and open source applications. Delivered Tuesdays
Sign up todayAlso see
- How to export and import MySQL databases (TechRepublic)
- How to install MySQL on CentOS 7 (TechRepublic)
- How to install MyWebSQL on Ubuntu 16.04 (TechRepublic)
- Mark Shuttleworth reveals Ubuntu 18.04 will get a 10-year support lifespan (ZDNet)
- What is SDN? How software-defined networking changed everything (ZDNet)
- The Best VPN services for 2018 (CNET)
- 5G: More must-read coverage (TechRepublic on Flipboard)

Image: Jack Wallen
How to Install Phpmyadmin in Ubuntu 18.04 Using Terminal
Source: https://www.techrepublic.com/article/how-to-install-phpmyadmin-on-ubuntu-18-04/
0 Response to "How to Install Phpmyadmin in Ubuntu 18.04 Using Terminal"
Post a Comment